 ## Introduction
:::
- This is a [cloud-based](https://docs.aihub.gg/extra/glossary/#cloud-based) alternative to run [Applio](https://docs.aihub.gg/rvc/local/applio/), an RVC Fork, for users who do not have a powerful local PC GPU.
- Most of these options provide the exact same Web UI as the local version.
***
:::content-center
## Choose your Cloud Service
:::
Set up the program using your preferred cloud service guide. Once configured, use the Public Tunnel URL to open the interface and continue with the next steps
## Introduction
:::
- This is a [cloud-based](https://docs.aihub.gg/extra/glossary/#cloud-based) alternative to run [Applio](https://docs.aihub.gg/rvc/local/applio/), an RVC Fork, for users who do not have a powerful local PC GPU.
- Most of these options provide the exact same Web UI as the local version.
***
:::content-center
## Choose your Cloud Service
:::
Set up the program using your preferred cloud service guide. Once configured, use the Public Tunnel URL to open the interface and continue with the next steps
Google Colab Web UI
Decent performance and easiest setup for standard use.
Kaggle
Generous free GPU quotas. Great alternative if Google Colab is limited.
Lightning.AI
Persistent storage and powerful GPUs.
HuggingFace Space
Best for quick inference. Limited free hardware.
Google Colab No UI
No UI workflow for no ban risk on free tier and maximum resource efficiency.
 - It'll finish when you see a tick symbol on the left.
 ***
######
- Sync with Google Drive to automatically save or load models.
***
######
- Sync with Google Drive to automatically save or load models.
 ***
######
- Select a Sharing method and Run the Server, using a tunnel that securely exposes the application running in your private cloud environment to the public internet. The notebook gives you 3 different services to do this. Choose one from the `method` dropdown menu in the code cell.
- **Gradio (Fast, Popular, Reliable & Default)**
- **How it works:** This is a built-in [Gradio](https://docs.aihub.gg/extra/glossary/#gradio) feature. It's one of the most straightforward methods as it doesn't require any external accounts or tokens.
- **Steps:**
1. Select "Gradio" from the `method` dropdown menu.
2. Run the cell. The public Gradio URL (ending in `gradio.live`) will be printed in the output once the server is ready. Click on it to access the Web UI.
- **Ngrok (Fast, Popular & Reliable)**
- **How it works:** Ngrok is a popular service that creates secure tunnels. It requires a free account and an authentication token. It has a 1GB Bandwidth Free Monthly Limit.
- **Steps:**
1. Go to the [Ngrok Dashboard](https://dashboard.ngrok.com/get-started/your-authtoken) to get your free authtoken.
2. In the notebook cell, paste your token into the `ngrok_token` field.
3. (Optional) To potentially reduce latency, select a geographical `Region` from the list of parameter options next to it, that is closest to you.
4. Run the cell. The public Ngrok URL (ending in `ngrok.io`) will be printed in the output once the server is ready. Click on it to access the Web UI.
- **LocalTunnel (No Account, Password Protected)**
- **How it works:** LocalTunnel is another free service that doesn't require an account. For security, it generates a unique URL that is protected by a password.
- **Steps:**
1. Select "LocalTunnel" from the `method` dropdown menu.
2. Run the cell.
3. The output will display two key pieces of information: the public URL (ending in `loca.lt`) and a `Local Tunnel Password` below it.
4. Click the URL. A new page will ask for a password.
5. Copy the password from the notebook output and paste it into the password prompt in your browser to access the Web UI.
***
######
- Select a Sharing method and Run the Server, using a tunnel that securely exposes the application running in your private cloud environment to the public internet. The notebook gives you 3 different services to do this. Choose one from the `method` dropdown menu in the code cell.
- **Gradio (Fast, Popular, Reliable & Default)**
- **How it works:** This is a built-in [Gradio](https://docs.aihub.gg/extra/glossary/#gradio) feature. It's one of the most straightforward methods as it doesn't require any external accounts or tokens.
- **Steps:**
1. Select "Gradio" from the `method` dropdown menu.
2. Run the cell. The public Gradio URL (ending in `gradio.live`) will be printed in the output once the server is ready. Click on it to access the Web UI.
- **Ngrok (Fast, Popular & Reliable)**
- **How it works:** Ngrok is a popular service that creates secure tunnels. It requires a free account and an authentication token. It has a 1GB Bandwidth Free Monthly Limit.
- **Steps:**
1. Go to the [Ngrok Dashboard](https://dashboard.ngrok.com/get-started/your-authtoken) to get your free authtoken.
2. In the notebook cell, paste your token into the `ngrok_token` field.
3. (Optional) To potentially reduce latency, select a geographical `Region` from the list of parameter options next to it, that is closest to you.
4. Run the cell. The public Ngrok URL (ending in `ngrok.io`) will be printed in the output once the server is ready. Click on it to access the Web UI.
- **LocalTunnel (No Account, Password Protected)**
- **How it works:** LocalTunnel is another free service that doesn't require an account. For security, it generates a unique URL that is protected by a password.
- **Steps:**
1. Select "LocalTunnel" from the `method` dropdown menu.
2. Run the cell.
3. The output will display two key pieces of information: the public URL (ending in `loca.lt`) and a `Local Tunnel Password` below it.
4. Click the URL. A new page will ask for a password.
5. Copy the password from the notebook output and paste it into the password prompt in your browser to access the Web UI.
 ***
:::content-center
### Kaggle
:::
!!!danger Kaggle Service
**Check the [Kaggle Glossary](https://docs.aihub.gg/extra/glossary/#kaggle) for more info on Free Tier, Limits, Verification, Pricing and other things.**
!!!
#### Account Setup
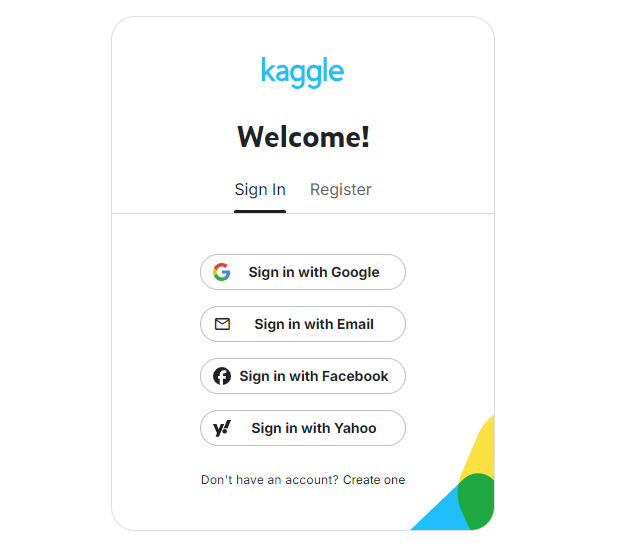
- Start by making an account [here](https://www.kaggle.com/account/login?phase=startRegisterTab&returnUrl=%2F).
***
:::content-center
### Kaggle
:::
!!!danger Kaggle Service
**Check the [Kaggle Glossary](https://docs.aihub.gg/extra/glossary/#kaggle) for more info on Free Tier, Limits, Verification, Pricing and other things.**
!!!
#### Account Setup
- Start by making an account [here](https://www.kaggle.com/account/login?phase=startRegisterTab&returnUrl=%2F).
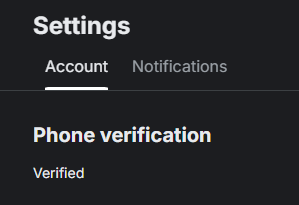
 - Verify your account with a phone number. This is required to enable the "Internet" option in your notebooks, which is necessary for downloading models and dependencies.
 ***
#### Notebook Creation & Setup
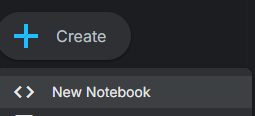
- Go to [Kaggle](https://www.kaggle.com) and click **Create** then **New Notebook** at the top left.
***
#### Notebook Creation & Setup
- Go to [Kaggle](https://www.kaggle.com) and click **Create** then **New Notebook** at the top left.
 - Under your session's name click **File** then **Import Notebook**.
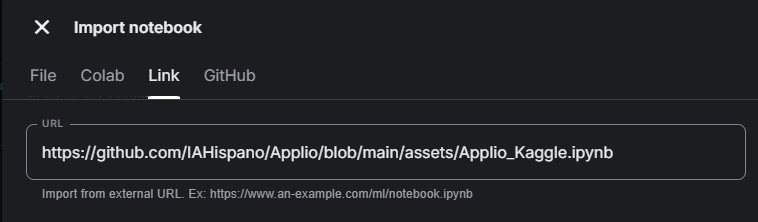
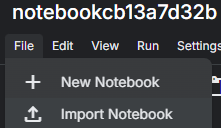 - In the new window, click the **Link** tab and paste the following URL into the box: `https://github.com/IAHispano/Applio/blob/main/assets/Applio_Kaggle.ipynb`. Click **Import** on the bottom right once you've done this.
 - In the sidebar on the right, under "Session options", turn on the **Internet** switch. Make sure persistence is set to **Files and variables**.
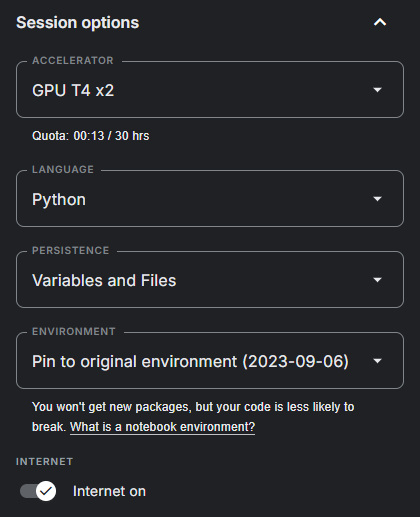 - Under "Accelerator", select the **T4 x2** GPU.
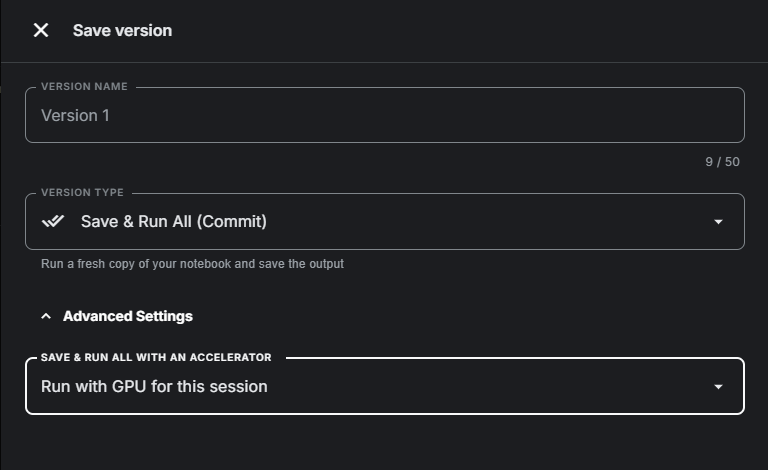
 - *(Optional)* To ensure your session doesn't time out during long training processes, you can enable "Save version". Go to the top right, click **Save version**, and choose **Save & Run All (Commit)** from the dropdown. In the advanced settings, select **Always save output** for the notebook.
 ***
#### Installation & Tunnels Setup
- Start by running the first few cells of the notebook to install the necessary dependencies.
- Configure and Run Tunnels: The next cell is for setting up the tunneling service, which exposes the Applio interface to the internet. Choose one from the `Tunnel` dropdown menu.
- **Ngrok (Recommended & Default method):** Requires a free account and an authentication token. Paste your token into the `ngrok_authtoken` field, select "Ngrok", and run the cell.
- **Gradio + LocalTunnel (No Account & Password Protected):** Uses Gradio's built-in tunnel for the main Applio interface and LocalTunnel for Tensorboard. Select this, run the cell, and use the provided password for LocalTunnel links.
- **LocalTunnel (No Account, Password Protected):** Generates a unique URL protected by a password. Select this, run the cell, and copy the `LocalTunnels Password` from the output.
- **Horizon (Fast, Requires Account & ID):** Requires a free account and a personal ID. Go to the [Horizon Dashboard](https://hrzn.run/dashboard/), copy your ID, paste it into `horizon_id`, and run the cell.
- Once configured, run the cell. The output will print public URLs for Applio, Tensorboard, and the Filebrowser. Click the Applio link to open the Web UI.
***
:::content-center
### Lightning.AI
:::
!!!danger Lightning.AI Service
**Check the [Lightning.AI Glossary](https://docs.aihub.gg/extra/glossary/#lightningai) for more info on Free Tier, Limits, Verification, Pricing and other things.**
!!!
#### Create an Account
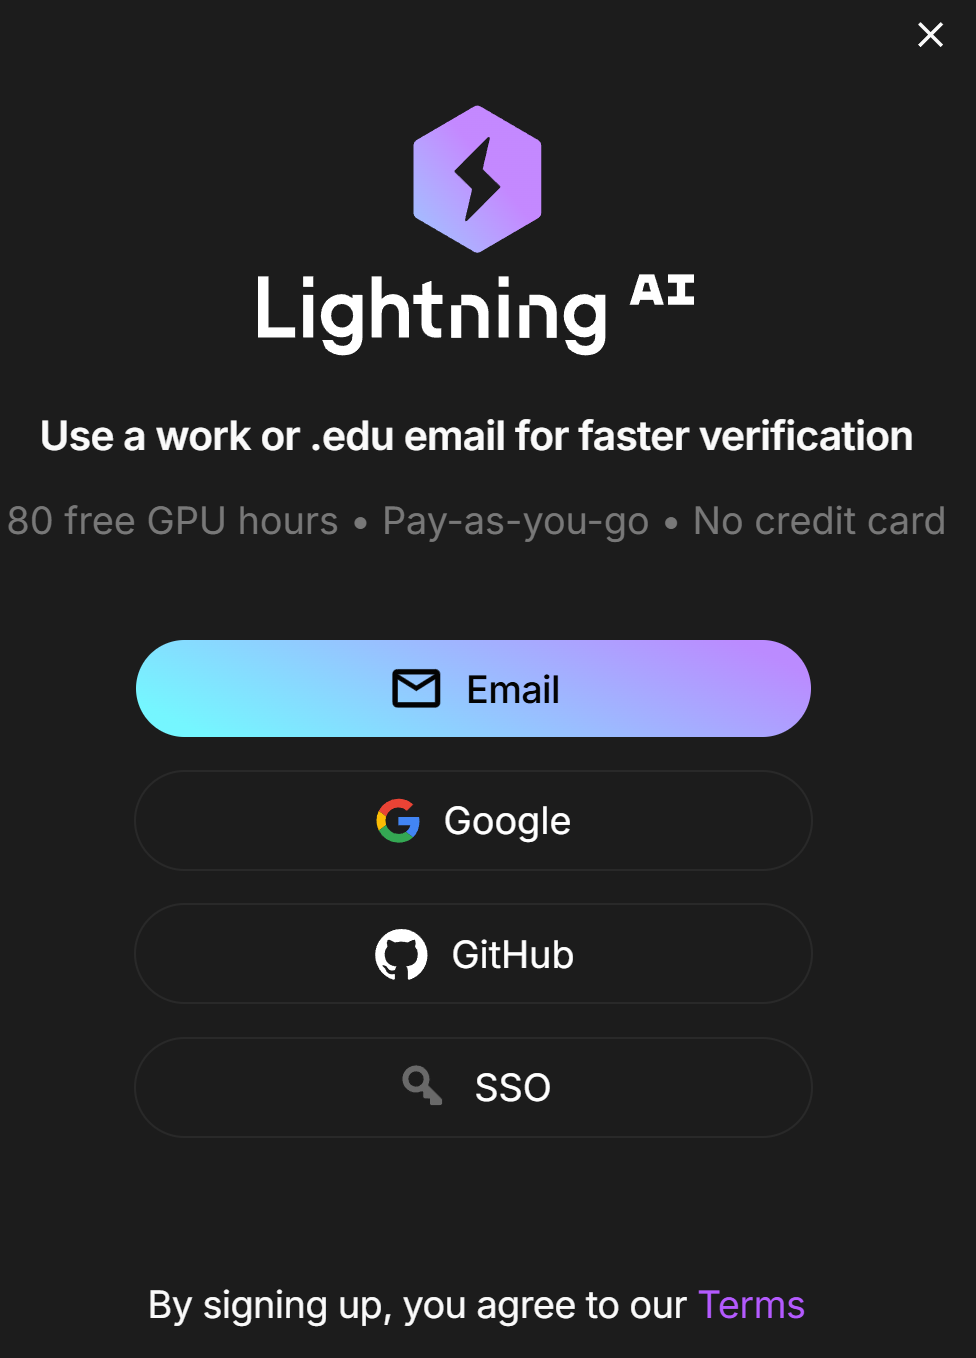
- First, make an account with [Lightning Ai](https://lightning.ai).
***
#### Installation & Tunnels Setup
- Start by running the first few cells of the notebook to install the necessary dependencies.
- Configure and Run Tunnels: The next cell is for setting up the tunneling service, which exposes the Applio interface to the internet. Choose one from the `Tunnel` dropdown menu.
- **Ngrok (Recommended & Default method):** Requires a free account and an authentication token. Paste your token into the `ngrok_authtoken` field, select "Ngrok", and run the cell.
- **Gradio + LocalTunnel (No Account & Password Protected):** Uses Gradio's built-in tunnel for the main Applio interface and LocalTunnel for Tensorboard. Select this, run the cell, and use the provided password for LocalTunnel links.
- **LocalTunnel (No Account, Password Protected):** Generates a unique URL protected by a password. Select this, run the cell, and copy the `LocalTunnels Password` from the output.
- **Horizon (Fast, Requires Account & ID):** Requires a free account and a personal ID. Go to the [Horizon Dashboard](https://hrzn.run/dashboard/), copy your ID, paste it into `horizon_id`, and run the cell.
- Once configured, run the cell. The output will print public URLs for Applio, Tensorboard, and the Filebrowser. Click the Applio link to open the Web UI.
***
:::content-center
### Lightning.AI
:::
!!!danger Lightning.AI Service
**Check the [Lightning.AI Glossary](https://docs.aihub.gg/extra/glossary/#lightningai) for more info on Free Tier, Limits, Verification, Pricing and other things.**
!!!
#### Create an Account
- First, make an account with [Lightning Ai](https://lightning.ai).
 - Make sure you verify yourself with a phone number. Once you've done that you will get an email that looks like this:
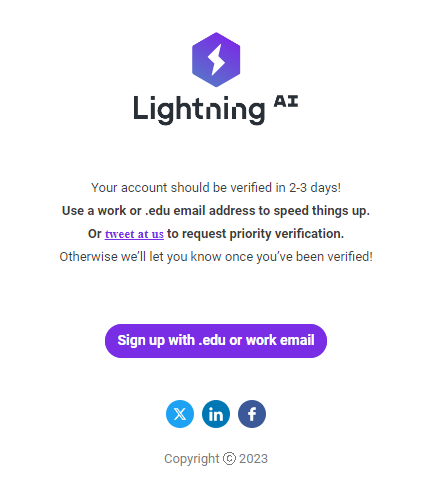 !!!danger Verification Time
You will need to wait 2-3 business days to become fully verified.
!!!
***
#### Studio Setup & Installation
- After creating your Lightning.AI account, open the [Applio Notebook Studio](https://lightning.ai/nick088/studios/applio-ui?view=public§ion=featured) and Clone it.
!!!danger Verification Time
You will need to wait 2-3 business days to become fully verified.
!!!
***
#### Studio Setup & Installation
- After creating your Lightning.AI account, open the [Applio Notebook Studio](https://lightning.ai/nick088/studios/applio-ui?view=public§ion=featured) and Clone it.
 - Activate/Switch GPU: If you aren't on a GPU environment by default, you must switch to a GPU environment. On the right-hand lateral menu, click on **Studio Environment** (the processor icon).
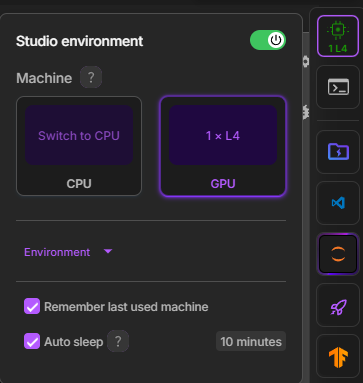 - Click **Switch To GPU**, select an available GPU, and wait for the environment to restart.
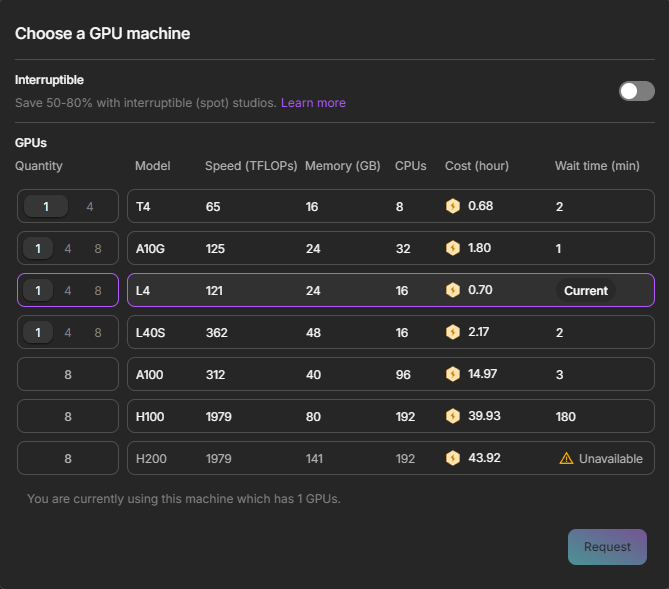 !!!info Free GPU Credits List:
- 75 hours monthly of T4 16gb
- 31 hours monthly of L4 24gb
- 15 hours monthly of L40 48gb
!!!
- Run the first code cell to download the latest version of Applio and install necessary dependencies. It will print "Installed!" when finished.
***
#### Tunnels & Server Setup
- Launch the Server via Tunnels: Navigate to the third code cell, titled "Start Server **using Tunnels**". Choose one from the `Tunnel` code menu in the code cell.
- **Port Viewer (Recommended & Default method):** A built-in Lightning.AI feature. Select "Port Viewer". Click the `+` at the bottom of the right tab, click on Web Apps and install Port Viewer. Run the cell. In the right-hand sidebar, click the **Web Apps** tab, click Port Viewer -> Add a new port. Enter `18888` and click your Port to open it.
- **Gradio (Fast, Popular & Reliable):** Select "Gradio" and run the cell. Click the `.gradio.live` link in the output.
- **Ngrok (Fast, Popular & Reliable):** Get your [Ngrok authtoken](https://dashboard.ngrok.com/get-started/your-authtoken), paste it into the `Token` field, and run the cell.
- **Cloudflare (Easy, No Account Needed):** Select "Cloudflare" and run the cell. A `.trycloudflare.com` link will appear.
- **LocalTunnel (No Account, Password Protected):** Select "LocalTunnel" and run the cell. Copy the `Local Tunnel Password` and use it on the generated link.
- **Horizon (Fast, Requires Account & ID):** Go to the [Horizon Dashboard](https://hrzn.run/dashboard/), copy your ID, paste it into the `Token` field, and run the cell.
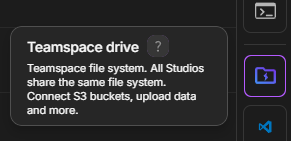
- Accessing Files manually: Find the **Teamspace Drive** button on the right sidebar and click it. The path to Applio is `Studio > this_studio > Applio > Applio`. You can drag, drop, and download files directly from here.
!!!info Free GPU Credits List:
- 75 hours monthly of T4 16gb
- 31 hours monthly of L4 24gb
- 15 hours monthly of L40 48gb
!!!
- Run the first code cell to download the latest version of Applio and install necessary dependencies. It will print "Installed!" when finished.
***
#### Tunnels & Server Setup
- Launch the Server via Tunnels: Navigate to the third code cell, titled "Start Server **using Tunnels**". Choose one from the `Tunnel` code menu in the code cell.
- **Port Viewer (Recommended & Default method):** A built-in Lightning.AI feature. Select "Port Viewer". Click the `+` at the bottom of the right tab, click on Web Apps and install Port Viewer. Run the cell. In the right-hand sidebar, click the **Web Apps** tab, click Port Viewer -> Add a new port. Enter `18888` and click your Port to open it.
- **Gradio (Fast, Popular & Reliable):** Select "Gradio" and run the cell. Click the `.gradio.live` link in the output.
- **Ngrok (Fast, Popular & Reliable):** Get your [Ngrok authtoken](https://dashboard.ngrok.com/get-started/your-authtoken), paste it into the `Token` field, and run the cell.
- **Cloudflare (Easy, No Account Needed):** Select "Cloudflare" and run the cell. A `.trycloudflare.com` link will appear.
- **LocalTunnel (No Account, Password Protected):** Select "LocalTunnel" and run the cell. Copy the `Local Tunnel Password` and use it on the generated link.
- **Horizon (Fast, Requires Account & ID):** Go to the [Horizon Dashboard](https://hrzn.run/dashboard/), copy your ID, paste it into the `Token` field, and run the cell.
- Accessing Files manually: Find the **Teamspace Drive** button on the right sidebar and click it. The path to Applio is `Studio > this_studio > Applio > Applio`. You can drag, drop, and download files directly from here.
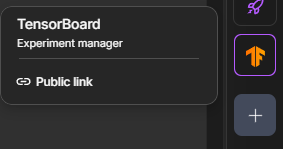
 - Opening the TensorBoard: Find the TensorBoard icon on the right sidebar, click it, and start it to monitor your training visually.
 - Opening the notebook: If you want to go back to the code view, simply click on the `Jupyter` icon on the right sidebar.
 - **Maintenance:** If you need to update the Program or start fresh, you can run the final cell in the notebook, "Delete everything". This will remove all downloaded files and configurations from your persistent storage, allowing for a clean installation by re-following the notebook with perhaps a changed branch variable.
***
:::content-center
### HuggingFace Space
:::
!!!danger HuggingFace Space Service
**Check the [HuggingFace Space Glossary](https://docs.aihub.gg/extra/glossary/#huggingface-space) for more info on Free Tier, Limits, Quotas and other things.**
!!!
!!!danger HuggingFace Space Limits
- The ApplioX HuggingFace Space doesn't have Training, Realtime, or Plugin tabs. It is for Inference only.
- RVC HuggingFace Spaces frequently get paused without warning.
!!!
!!!danger RVC HuggingFace Spaces Pausing Issue
**Please be aware that HuggingFace has recently been pausing RVC-related Spaces without providing any reason.**
!!!
- Open the [ApplioX HuggingFace Space](https://huggingface.co/spaces/IAHispano/ApplioX).
- The Web UI will load directly in your browser without any installation required.
***
:::content-center
## Web UI Usage
:::
Once you have the Web UI running via your chosen Cloud Provider (Colab, Kaggle, Lightning.AI, or ApplioX), the rest of the process is **identical to using a local installation.**
Use the Local Guide below for detailed instructions on Inference, Training, TTS, and Plugins.
[!button text="Continue with the Local Guide" icon="arrow-right" target="blank"](https://docs.aihub.gg/rvc/local/applio/#inference)
***
:::content-center
## Google Colab No UI Usage
:::
This is a strictly code-based workflow for users who want to maximize Colab resource efficiency and avoid potential bans on the free tier by not loading a Web UI.
!!!warning Note on Updates
Because this workflow relies directly on executing notebook cells rather than a stable Web UI, the notebook's structure and variable names might change frequently between updates.
!!!
- Open the [Applio No UI Colab](https://colab.research.google.com/github/IAHispano/Applio/blob/main/assets/Applio_NoUI.ipynb) and run the `Installation` cell.
- **Maintenance:** If you need to update the Program or start fresh, you can run the final cell in the notebook, "Delete everything". This will remove all downloaded files and configurations from your persistent storage, allowing for a clean installation by re-following the notebook with perhaps a changed branch variable.
***
:::content-center
### HuggingFace Space
:::
!!!danger HuggingFace Space Service
**Check the [HuggingFace Space Glossary](https://docs.aihub.gg/extra/glossary/#huggingface-space) for more info on Free Tier, Limits, Quotas and other things.**
!!!
!!!danger HuggingFace Space Limits
- The ApplioX HuggingFace Space doesn't have Training, Realtime, or Plugin tabs. It is for Inference only.
- RVC HuggingFace Spaces frequently get paused without warning.
!!!
!!!danger RVC HuggingFace Spaces Pausing Issue
**Please be aware that HuggingFace has recently been pausing RVC-related Spaces without providing any reason.**
!!!
- Open the [ApplioX HuggingFace Space](https://huggingface.co/spaces/IAHispano/ApplioX).
- The Web UI will load directly in your browser without any installation required.
***
:::content-center
## Web UI Usage
:::
Once you have the Web UI running via your chosen Cloud Provider (Colab, Kaggle, Lightning.AI, or ApplioX), the rest of the process is **identical to using a local installation.**
Use the Local Guide below for detailed instructions on Inference, Training, TTS, and Plugins.
[!button text="Continue with the Local Guide" icon="arrow-right" target="blank"](https://docs.aihub.gg/rvc/local/applio/#inference)
***
:::content-center
## Google Colab No UI Usage
:::
This is a strictly code-based workflow for users who want to maximize Colab resource efficiency and avoid potential bans on the free tier by not loading a Web UI.
!!!warning Note on Updates
Because this workflow relies directly on executing notebook cells rather than a stable Web UI, the notebook's structure and variable names might change frequently between updates.
!!!
- Open the [Applio No UI Colab](https://colab.research.google.com/github/IAHispano/Applio/blob/main/assets/Applio_NoUI.ipynb) and run the `Installation` cell.
 **2. Preprocess Dataset:** Name your model, upload your dataset to Google Drive, paste the path in `dataset_path`, select your sample rate, and run the cell.
 **3. Extract Features:** Choose your `f0_method` (RMVPE recommended) and run the cell.
**4. Training:** Set the `total_epoch`, choose your `batch_size` (8 recommended), enable `cleanup` (if this is a fresh run), and tick `save_only_latest`. Run the cell to start training!
**3. Extract Features:** Choose your `f0_method` (RMVPE recommended) and run the cell.
**4. Training:** Set the `total_epoch`, choose your `batch_size` (8 recommended), enable `cleanup` (if this is a fresh run), and tick `save_only_latest`. Run the cell to start training!
 **5. Resuming:** If you get disconnected, enter the exact model name from before, run the first two cells, select your sample rate/f0, and run the final training cell again.
***
:::content-center
## Troubleshooting
:::
==- There's no Gradio Public URL.
- In case the public URL doesn't show up, Gradio might be down. Check [here](https://status.gradio.app/).
- To bypass this, use other tunnels depending on the cloud service you're using (such as Ngrok, LocalTunnel, or Cloudflare).
===
==- I can't use the Cloud GPU after some time.
- You have exhausted the Free Cloud GPU. You will need to wait for it to reset, pay or switch to a different account.
===
==- There's no option for my sample rate.
- If it's lower than 32k: select `32k`.
- If it's 44.1k: select `40k`.
- If it's higher than 48k: select `48k`.
===
==- :question: I couldn't find my answer.
- Report your issue [here](https://docs.aihub.gg/contributions).
===
######
:::content-center
#### `You have reached the end.`
[!badge variant="info" size="xl" corners="pill" icon="paper-airplane" iconAlign="right" text="Report Issues"](https://docs.aihub.gg/contributions/)
:::
**5. Resuming:** If you get disconnected, enter the exact model name from before, run the first two cells, select your sample rate/f0, and run the final training cell again.
***
:::content-center
## Troubleshooting
:::
==- There's no Gradio Public URL.
- In case the public URL doesn't show up, Gradio might be down. Check [here](https://status.gradio.app/).
- To bypass this, use other tunnels depending on the cloud service you're using (such as Ngrok, LocalTunnel, or Cloudflare).
===
==- I can't use the Cloud GPU after some time.
- You have exhausted the Free Cloud GPU. You will need to wait for it to reset, pay or switch to a different account.
===
==- There's no option for my sample rate.
- If it's lower than 32k: select `32k`.
- If it's 44.1k: select `40k`.
- If it's higher than 48k: select `48k`.
===
==- :question: I couldn't find my answer.
- Report your issue [here](https://docs.aihub.gg/contributions).
===
######
:::content-center
#### `You have reached the end.`
[!badge variant="info" size="xl" corners="pill" icon="paper-airplane" iconAlign="right" text="Report Issues"](https://docs.aihub.gg/contributions/)
:::